Capture a Particular Part of Screen Again and Again With Greenshot
What is Greenshot?
Greenshot is a light-weight screenshot software tool for Windows with the following key features:
- Quickly create screenshots of a selected region, window or total screen; you can even capture complete (scrolling) web pages from Internet Explorer.
- Hands annotate, highlight or obfuscate parts of the screenshot.
- Consign the screenshot in various ways: salve to file, send to printer, copy to clipboard, adhere to east-mail service, ship Office programs or upload to photo sites similar Flickr or Picasa, and others.
...and a lot more options simplifying creation of and piece of work with screenshots every day.
Being easy to sympathise and configurable, Greenshot is an efficient tool for project managers, software developers, technical writers, testers and anyone else creating screenshots.
Contents
- Don't Have Greenshot? How to go information technology
- How to Offset Greenshot for the First Time
- How to set Greenshot to Auto-first
- How to utilise Greenshot
- Creating a screenshot
- Capture region
- Capture last region
- Capture window
- Capture full screen
- Capture Internet Explorer
- Using the image editor
- Drawing shapes
- Calculation text
- Highlighting things
- Obfuscating things
- Cropping the screenshot
- Calculation graphics to a screenshot
- Re-using drawn elements
- Exporting the screenshot
- The settings dialog
- General settings
- Capture settings
- Output settings
- Printer settings
- Creating a screenshot
Don't Take Greenshot? How to go it
Please cheque your Commencement Menu first every bit you may already have Greenshot installed on your estimator. Otherwise, refer to this tech tip to utilize the BigFix Self-Service Software to install Greenshot on your own: https://adminit.ucdavis.edu/tech-tips/how-install-software-ibm-bigfix-cocky-service
How to Start Greenshot for the Beginning Fourth dimension
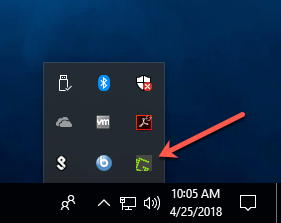
Navigate to your Start Carte du jour, locate Greenshot and click on information technology. The Greenshot icon will then appear on your task tray.
How to set Greenshot to Machine-offset
- In your task tray, left-click on the Greenshot icon
- Click Preferences
- Enable Launch Greenshot on startup
- Click OK
How to Use Greenshot
Creating a screenshot
You can create a screenshot either by using the Print Screen key on your keyboard or by right clicking the Greenshot icon in the chore tray.
There are several options for creating a screenshot:
Capture region
Keyboard Shortcut: Print Screen
The region capture fashion allows you to select a part of you screen to exist shot.
After starting region mode, y'all will run into a cross-hair pointing out the mouse position on the screen. Click and concur where you want one of the corners of your screenshot to be. All the same holding down the mouse button, elevate the mouse to define the rectangle to be shot. When the green rectangle covers the area you want to be captured in your screenshot, release the mouse button.
You can use the Space key to switch between region and window mode.
If you desire to capture an exact area, it might exist easier to select the initial screenshot surface area slightly larger and to crop the screenshot afterwards using Greenshot's image editor.
Capture final region
Keyboard Shortcut: Shift + Print Screen
If you did a region or window capture earlier, you can capture the same region again using this choice.
Capture window
Keyboard Shortcut: Alt + Impress Screen
Creates a screenshot of the window which is currently agile.
The settings dialog offers an selection not to capture the active window right away but allowing you to select 1 interactively. If this choice is selected, you may select a window by clicking it (As in region style, Greenshot will highlight the area that will be captured). If you desire a child window to be captured (e.g. a browser viewport (without toolsbars etc.) or a unmarried frame of a web page using framesets) signal the mouse cursor to the window and hit the PgDown primal. After doing so, you can select child elements of the window to be captured.
Capturing context menus on their own is dissimilar: using the "Capture window" shortcut would make the context bill of fare disappear, and obviously the aforementioned would happen if you used Greenshot's context menu in lodge to create the screenshot. If you want to capture a context menu you accept just brought upwardly by right-clicking anything, simply actuate region manner Impress Screen, and then press the Space key.
Capture full screen
Keyboard Shortcut: Control + Print Screen
Creates a screenshot of the complete screen.
Capture Net Explorer
Keyboard Shortcut: Control + Shift + Impress Screen
Comfortably creates a screenshot of a web page currently opened in Internet Explorer. Use Greenshot's context carte du jour to select the Internet Explorer tab to capture, or hit Crtl + Shift + Print to capture the active tab.
Using the image editor
Greenshot comes with an easy-to-utilize image editor, providing a handy characteristic set to add annotations or shapes to a screenshot. It even allows to highlight or obfuscate parts of your screenshot.
Greenshot's image editor may not only be used for screenshots. You can also open images for editing from a file or from clipboard. Merely right-click the Greenshot icon in the task tray and select Open image from file or Open prototype from clipboard, respectively.
Past default, the epitome editor will be opened whenever a screenshot is captured. If you do not want to use the image editor, you can disable this beliefs in the settings dialog.
Drawing shapes
Select one of the shape drawing tools from the toolbar on the left hand side of the prototype editor or from the Object menu. There is also a key assigned to each tool for your convenience.
Available shapes are: rectangle R, ellipse East, line L, pointer A and freehand line F.
Click, hold downwards the mouse push and drag to define position and size of the shape. Release the mouse push button when y'all are done.
You lot can motility or resize existing shapes later on selecting the option tool ESC from the toolbar. For every element type there is a specific set of options available to alter the await of the element (east.chiliad. line thickness, line color, fill color). You tin change the options for an existing chemical element after
selecting it, only also for the side by side element to be drawn afterward selecting a drawing tool.
You can select multiple elements for editing at a time. In social club to select multiple elements, hold down the Shift primal while clicking the elements.
If you lot want to draw equilateral shapes (due east.thousand. force a rectangle to be a square) hold down Shift while drawing. When drawing lines or arrows, belongings downwardly Shift results in the line'southward angle being rounded in steps 15°.
You can too apply Shift if you desire to resize an existing object maintaining it'southward aspect ratio.
When drawing or scaling, you tin concord down Ctrl to have the object anchored in it'south geometrical middle. I.e. the object is resized in the contrary direction, too. (This is very handy if you lot want to draw an ellipse around something on your screenshot.)
Adding text
Usage of the text tool T is similar to the usage of the shape tools. But describe the text element to the desired size, so blazon in the text.
Double click an existing text element to edit the text. Striking Return or Enter when you have finished editing.
If y'all need to insert line breaks within a text box, hit Shift + Return or Shift + Enter.
Highlighting things
Subsequently selecting the highlight tool H, you lot can ascertain the expanse to be highlighted exactly like you would draw a shape.
There are several options for highlighting, which you tin can choose from by clicking the leftmost button in the toolbar on peak:
- Highlight text: highlights an area past applying a bright color to it, similar
an office text highlighter - Highlight surface area: blurs* and darkens everything outside the selected area
- Grayscale: everything outside the selected area will exist turned to grayscale
- Magnify: the selected area will be displayed magnified
Obfuscating things
Obfuscating parts of a screenshot is a expert idea if it contains data which is not intended for other people to see, due east.chiliad. banking concern account data, names, passwords or faces on images.
Use the obfuscate tool exactly like the highlight tool.
Available options for obfuscation are:
- Pixelize: increases the pixel size for the selected surface area
- Mistiness*: blurs the selected area
* Depending on the performance of your computer, applying a mistiness event might slow downwards Greenshot'south epitome editor. If yous feel the prototype editor reacting slowly as soon as a mistiness is practical, effort reducing the value for Preview quality in the toolbar or decrease the value for Mistiness radius.
If the blur functioning is still too bad for you to work with, you lot might adopt to use the pixelize issue instead.
Cropping the screenshot
If you simply need a part of the screenshot you have captured, use the ingather tool C to crop it to the desired area.
Afterwards selecting the ingather tool, draw a rectangle for the surface area of the screenshot you want to keep. You lot can resize the selected area like any other element.
When you lot are content with your selection, use the ostend button in the toolbar or striking the Enter key. You can cancel cropping by clicking the cancel push or hitting ESC.
Auto-Crop: If you need to crop a edge of solid groundwork color from your screenshot, merely choose Motorcar-Ingather from the Edit carte du jour and Greenshot will automatically select the surface area for cropping.
Calculation graphics to a screenshot
You can merely add graphics or images to your screenshot by dragging and dropping an image file into the editor window. Y'all can also insert screenshots of other windows by selecting Insert window from the Edit menu. A list of all open windows appears, allowing y'all to select one for insertion.
Re-using fatigued elements
If yous find yourself using the same or similar elements on almost of your screenshots (e.grand. a text field containing browser type and version, or obfuscating the same chemical element on several screenshots) you can re-utilise elements.
Select Save objects to file from the Object card to save the current set of elements for re-using it after. Load objects from file applies the same elements to another screenshot.
Exporting the screenshot
After editing the screenshot, you can export the effect for dissimilar purposes, depending on your needs. You lot tin access all export options through the File menu, the topmost toolbar or via shortcuts:
- Save Control + Southward: saves the paradigm to a file (if the prototype has already been saved, else displays Salvage every bit... dialog
- Save as... Control + Shift + S: lets y'all choose location, filename and image format for the file to salve
- Re-create image to clipboard Command + Shift + C: puts a copy of the image into the clipboard, assuasive to paste into other programs
- Print... Control + P: sends the paradigm to a printer
- E-Mail Control + Eastward: opens a new message in your default e-mail client, calculation the paradigm as attachment
After saving an paradigm from the editor, correct-click the status bar at the bottom of the editor window to either re-create the file path into the clipboard or open the containing directory in Windows Explorer.
The settings dialog
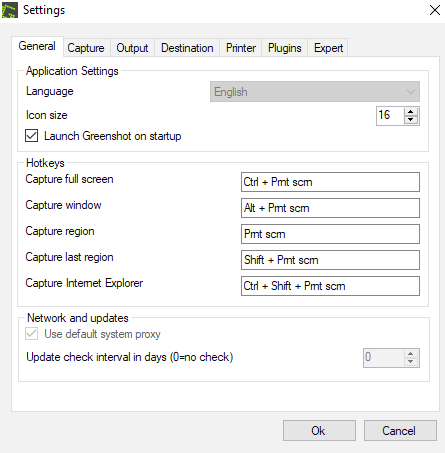
General settings
- Language: The language yous adopt to exist used.
- Launch Greenshot on startup: Start the plan when the system has been booted.
- Hotkeys: Customize the hotkeys to be used to create screenshots.
- Utilize default arrangement proxy: If checked, Greenshot uses the default organisation proxy to check for updates.
- Update bank check interval in days: Greenshot can cheque for updates automatically. Use this setting to adjust the
interval (in days) or set it to 0 to turn off update checks.
Capture settings
- Capture mouse pointer: If checked, the mouse pointer volition be captured. The pointer is handled is a separate element in the editor, so that you tin move or remove it after.
- Play camera sound: Audible feedback when doing a capture
- Milliseconds to wait earlier capture: Add a custom fourth dimension lag before actually capturing the screen.
- Use interactive window capture style: Instead of capturing the agile window right away, interactive mode
allows you lot to select the window to capture. Information technology is too possible to capture kid windows, see window capture. - Aero mode capture (Windows Vista / 7 just): If you are using Greenshot on Windows Vista or Windows vii with aero-way windows enabled, you can cull how transparent window borders are to be handled when creating a screenshot in window mode. Utilise this setting to avert capturing elements in the background shining through transparent borders.
- Auto: Allow Greenshot decide how to handle transparency.
- As displayed: Transparent borders are captured as displayed on screen.
- Utilise default color: A solid default color is applied instead of transparency.
- Use custom color: Pick a custom color to be applied instad of transparency.
- Preserve transparency: Borders are captured preserving transparency, not capturing elements which might exist in the background. (Note: transparent
areas are displayed using a checked pattern in the editor. The blueprint is non exported when saving the screenshot to a file. Go along in listen to salve every bit PNG
file for full transparency back up.)
- Internet Explorer capture: Enable comfortable capturing of web pages using Net Explorer.
- Resize editor window to screenshot size: If selected, the editor window volition automatically be resized to fit the size of the screenshot.
Output settings
- Screenshot destination: Allows you to choose the destination(southward) for your screenshot correct after capturing it.
- Preferred output file settings: Directory and filename to be used when saving directly or to be suggested when saving (using the salvage-equally dialog). Click the ? button to learn more almost the placeholders that tin be used as filename pattern.
- JPEG settings: Quality to be used when saving JPEG files
Printer settings
- Shrink printout to fit newspaper size: If the image would exceed newspaper size, it will be shrinked to fit on the page.
- Overstate printout to fit paper size: If the image is smaller than the paper size, it volition be scaled to be printed equally large as possible without exceeding paper size.
- Rotate printout to page orientation: Volition rotate a landscape format image past 90° for printing.
- Print with inverted colors: Will invert the screenshot before press it, useful due east.thousand. when printing a screenshot of white text on black background (to save toner/ink).
Source: https://adminit.ucdavis.edu/tech-tips/take-screenshots-greenshot-windows
Belum ada Komentar untuk "Capture a Particular Part of Screen Again and Again With Greenshot"
Posting Komentar